Introducing the FieldPrism App!
All of FieldPrism's tools are now in one powerful smartphone app. Create snapshot vouchers, scan QR codes, and capture standardized images ready for quantitative analysis.

All of FieldPrism's tools are now in one powerful smartphone app. Create snapshot vouchers, scan QR codes, and capture standardized images ready for quantitative analysis.
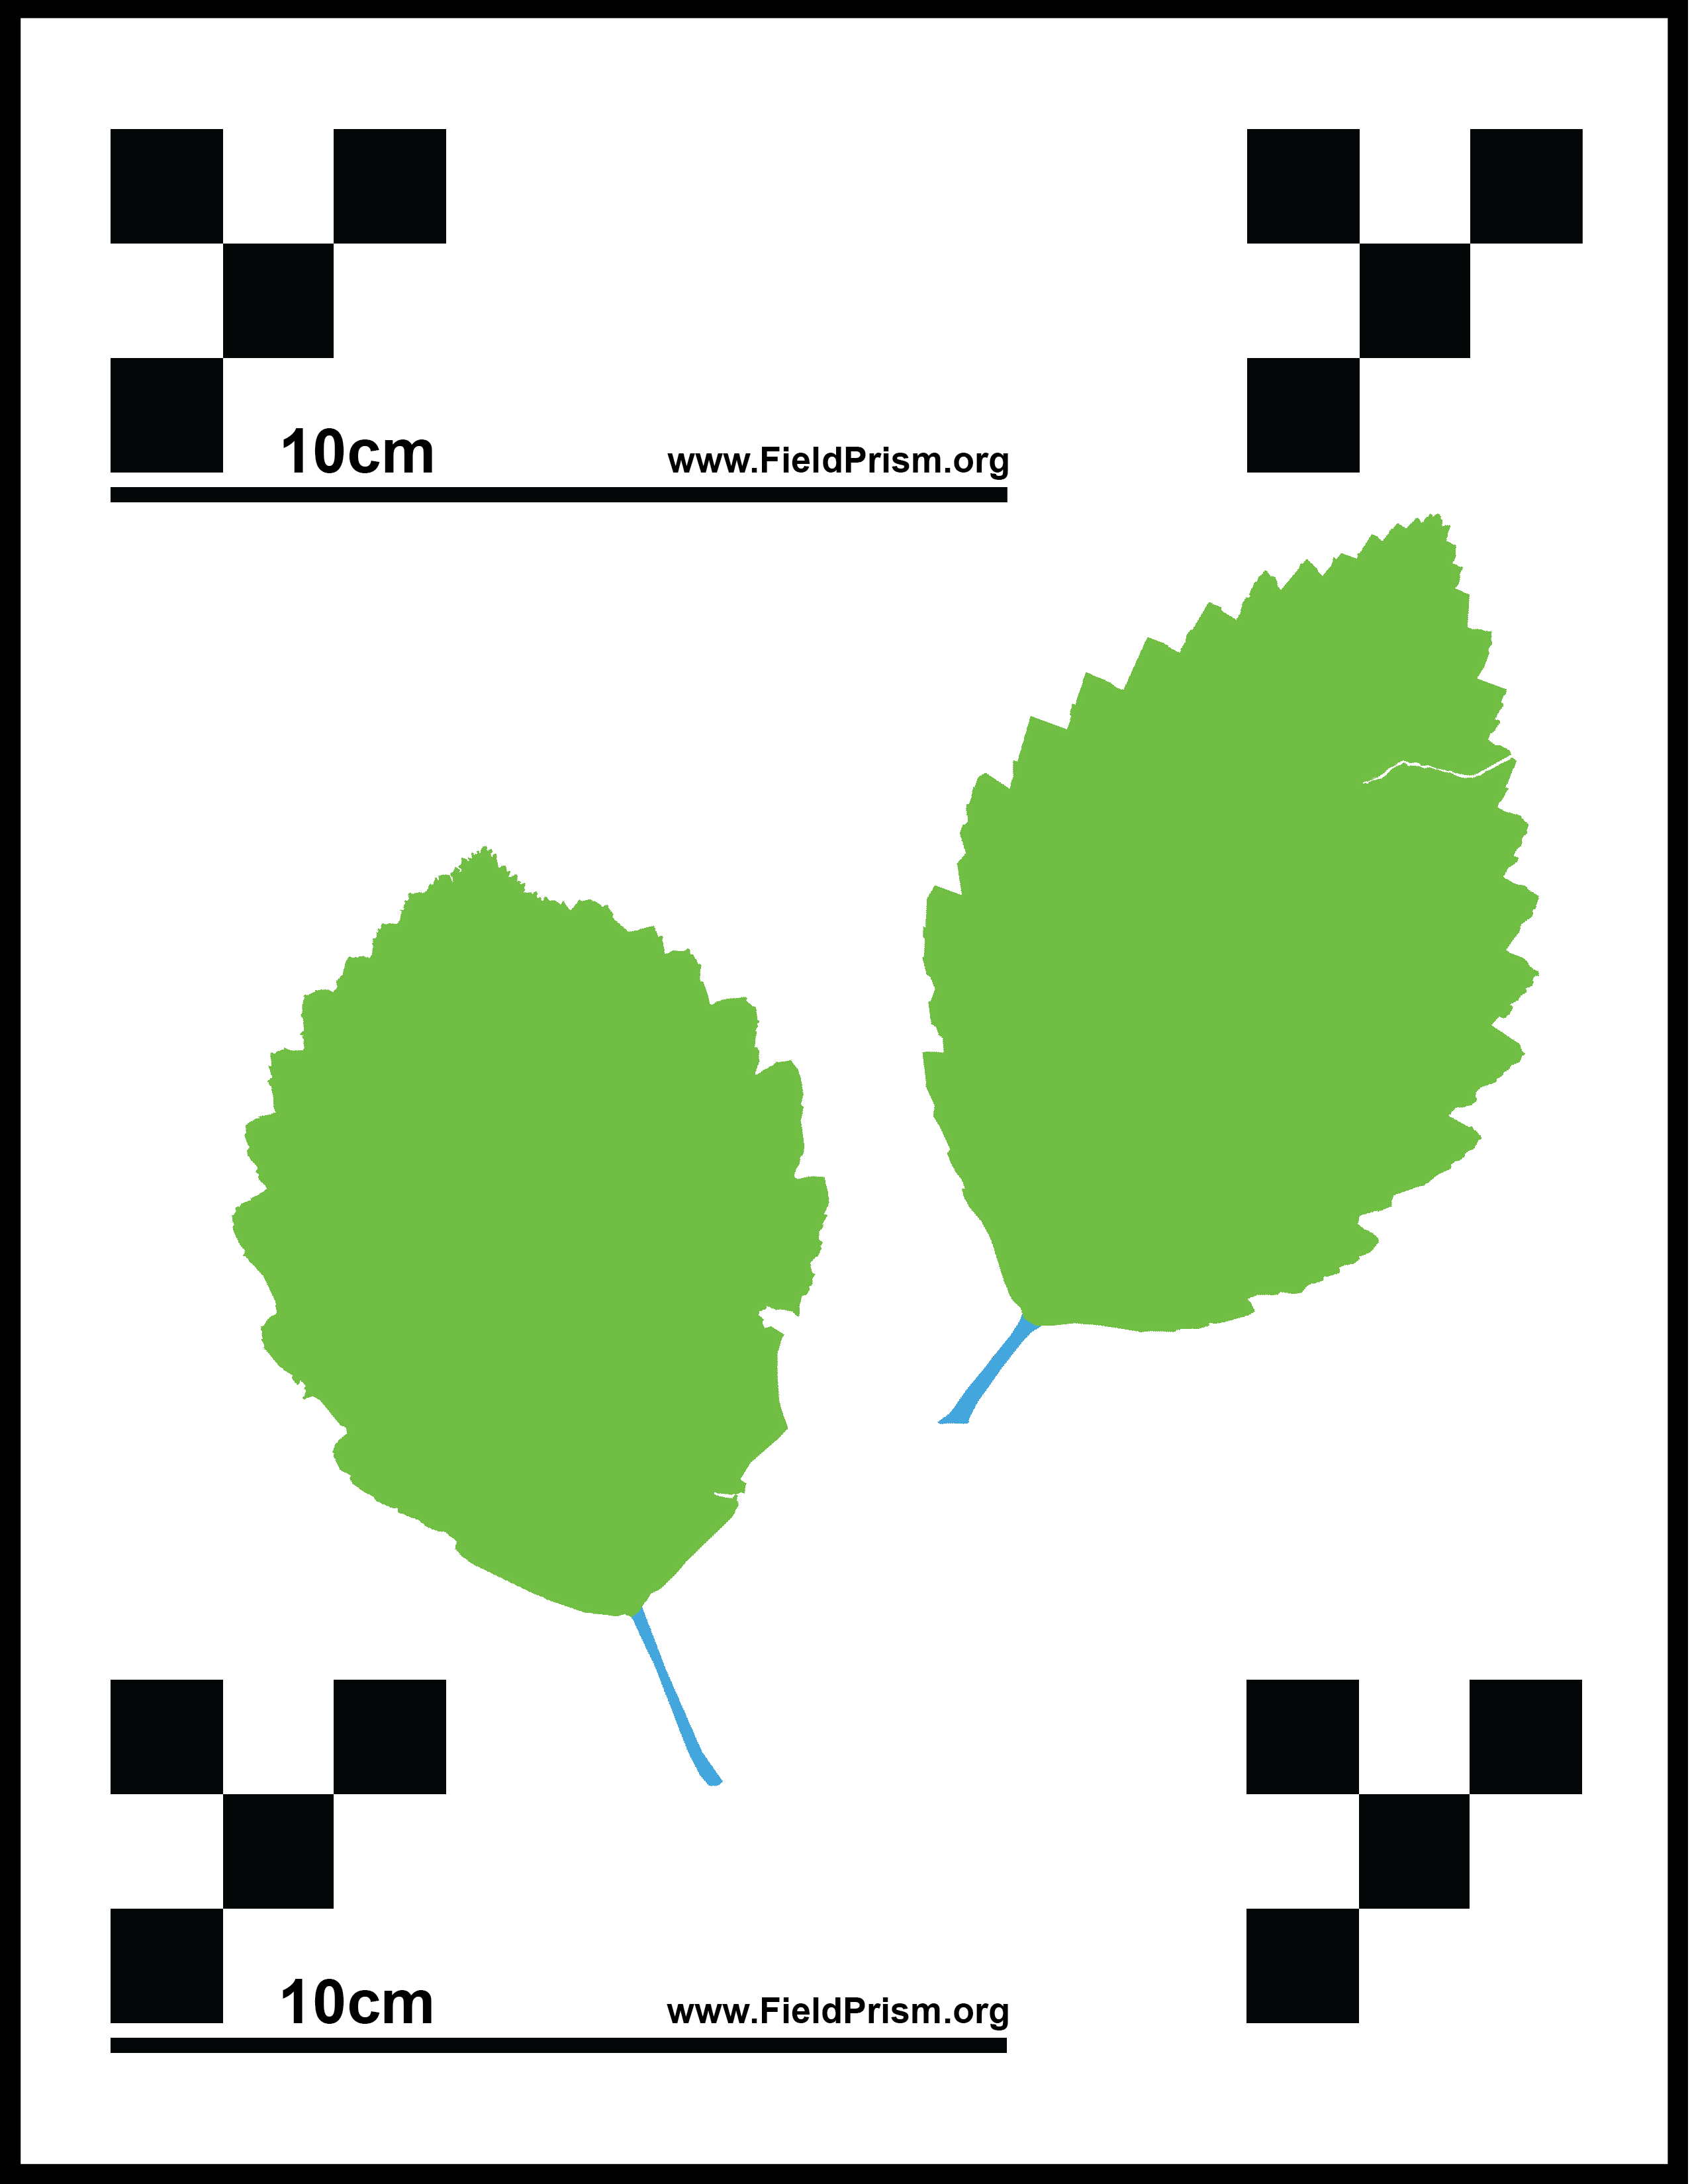
Premise: Field images are important sources of information for research in the natural sciences. However, images that lack photogrammetric scale bars, including most iNaturalist observations, cannot yield accurate trait measurements. We introduce FieldPrism, a novel system of photogrammetric markers, QR codes, and software to automate the curation of snapshot vouchers.
Methods and Results: Our photogrammetric background templates (FieldSheets) increase the utility of field images by providing machine-readable scale bars and photogrammetric reference points to automatically correct image distortion and calculate a pixel-to-metric conversion ratio. Users can generate a QR code flipbook derived from a specimen identifier naming hierarchy, enabling machine-readable specimen identification for automatic file renaming. We also developed FieldStation, a Raspberry Pi-based mobile imaging apparatus that records images, GPS location, and metadata redundantly on up to four USB storage devices and can be monitored and controlled from any Wi-Fi connected device.
Conclusions: FieldPrism is a flexible software tool designed to standardize and improve the utility of images captured in the field. When paired with the optional FieldStation, researchers can create a self-contained mobile imaging apparatus for quantitative trait data collection.
Key Words: digital specimen voucher; fieldwork; machine learning; mobile imaging; photogrammetry; QR code flipbook; field images; snapshot vouchers
Weaver, W. N., and S. A. Smith. 2023. FieldPrism: A system for creating snapshot vouchers from field images using photogrammetric markers and QR codes. Applications in Plant Sciences 11(5): e11545. doi:10.1002/aps3.11545
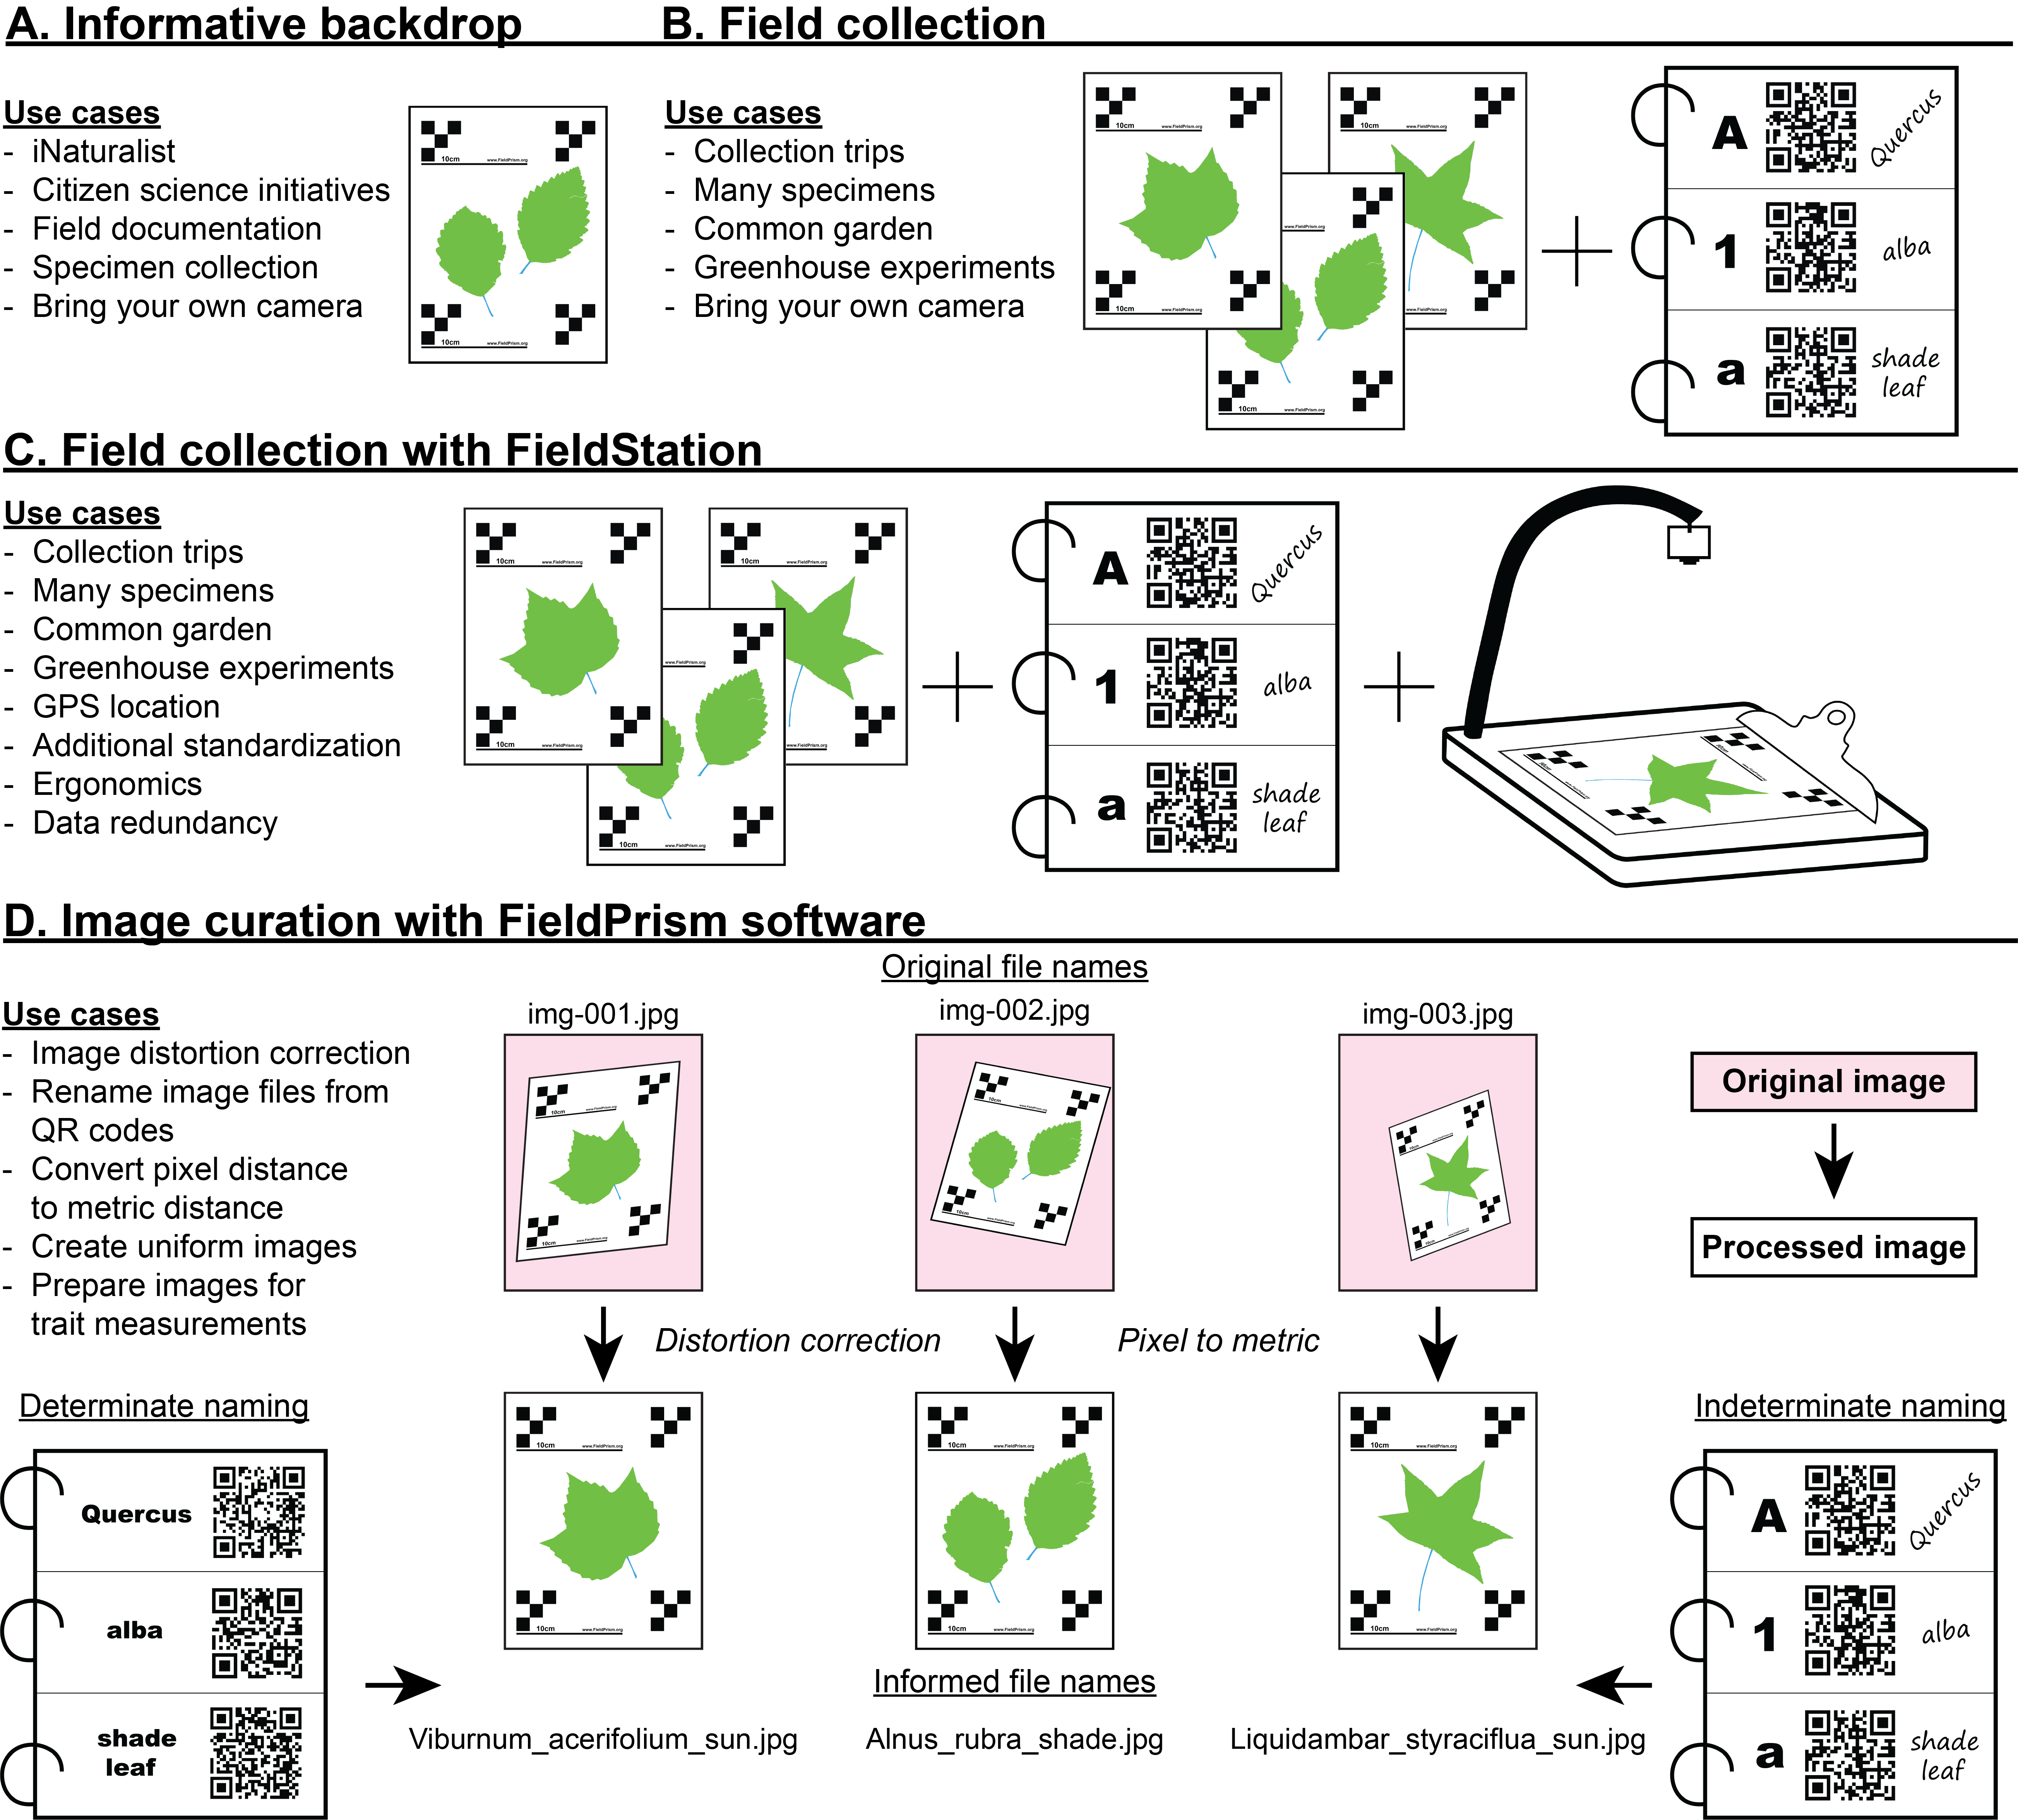
Figure 1: Four different ways to use FieldPrism. (A) Including FieldSheets in citizen science initiative, iNaturalist collections, or general field images can extend the utility of the images beyond their original scope. (B) Pairing a QR code flipbook with FieldSheets enables specimen curation and machine-readable identification for a variety of research. (C) Our mobile imaging system, FieldStation. improves imaging ergonomics, logs GPS coordinates, saves data redundantly, and increases standardization. (D) Our FieldPrism software can correct image and calculate a pixel-to-metric conversion ratio for any image that includes a FieldSheet. QR codes within an image can be decoded to generate a unique specimen identifier for renaming image files.
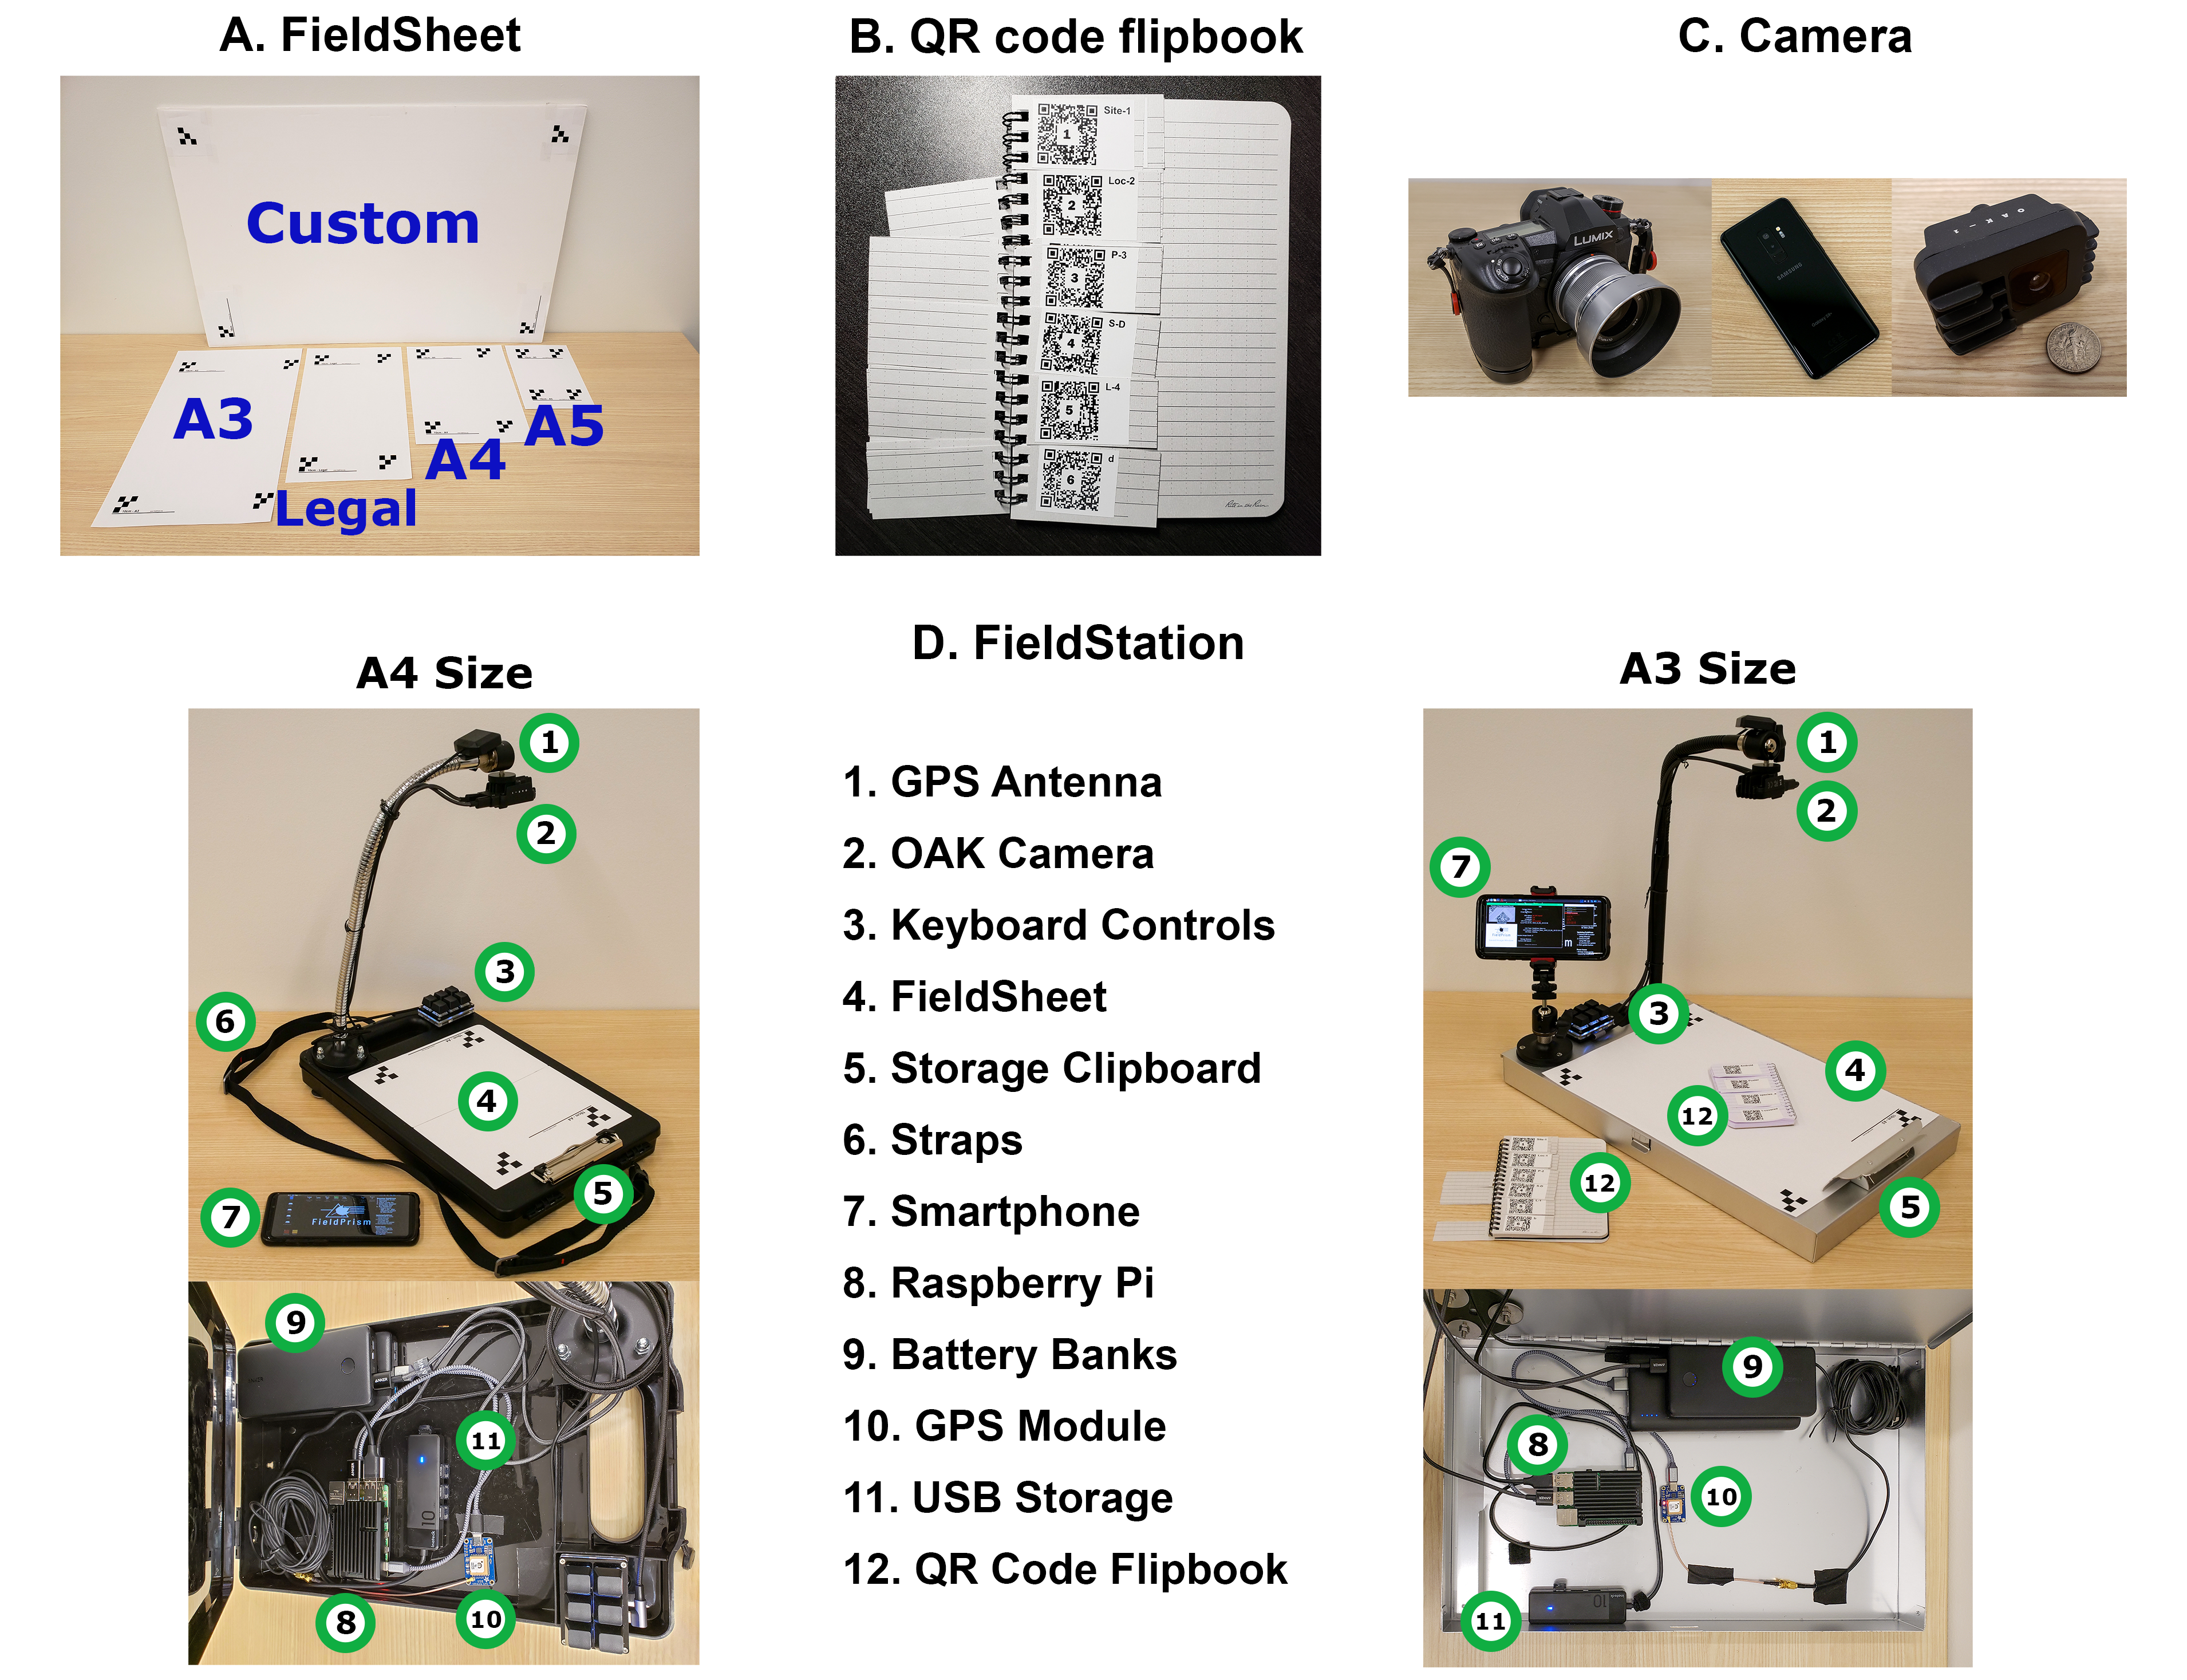
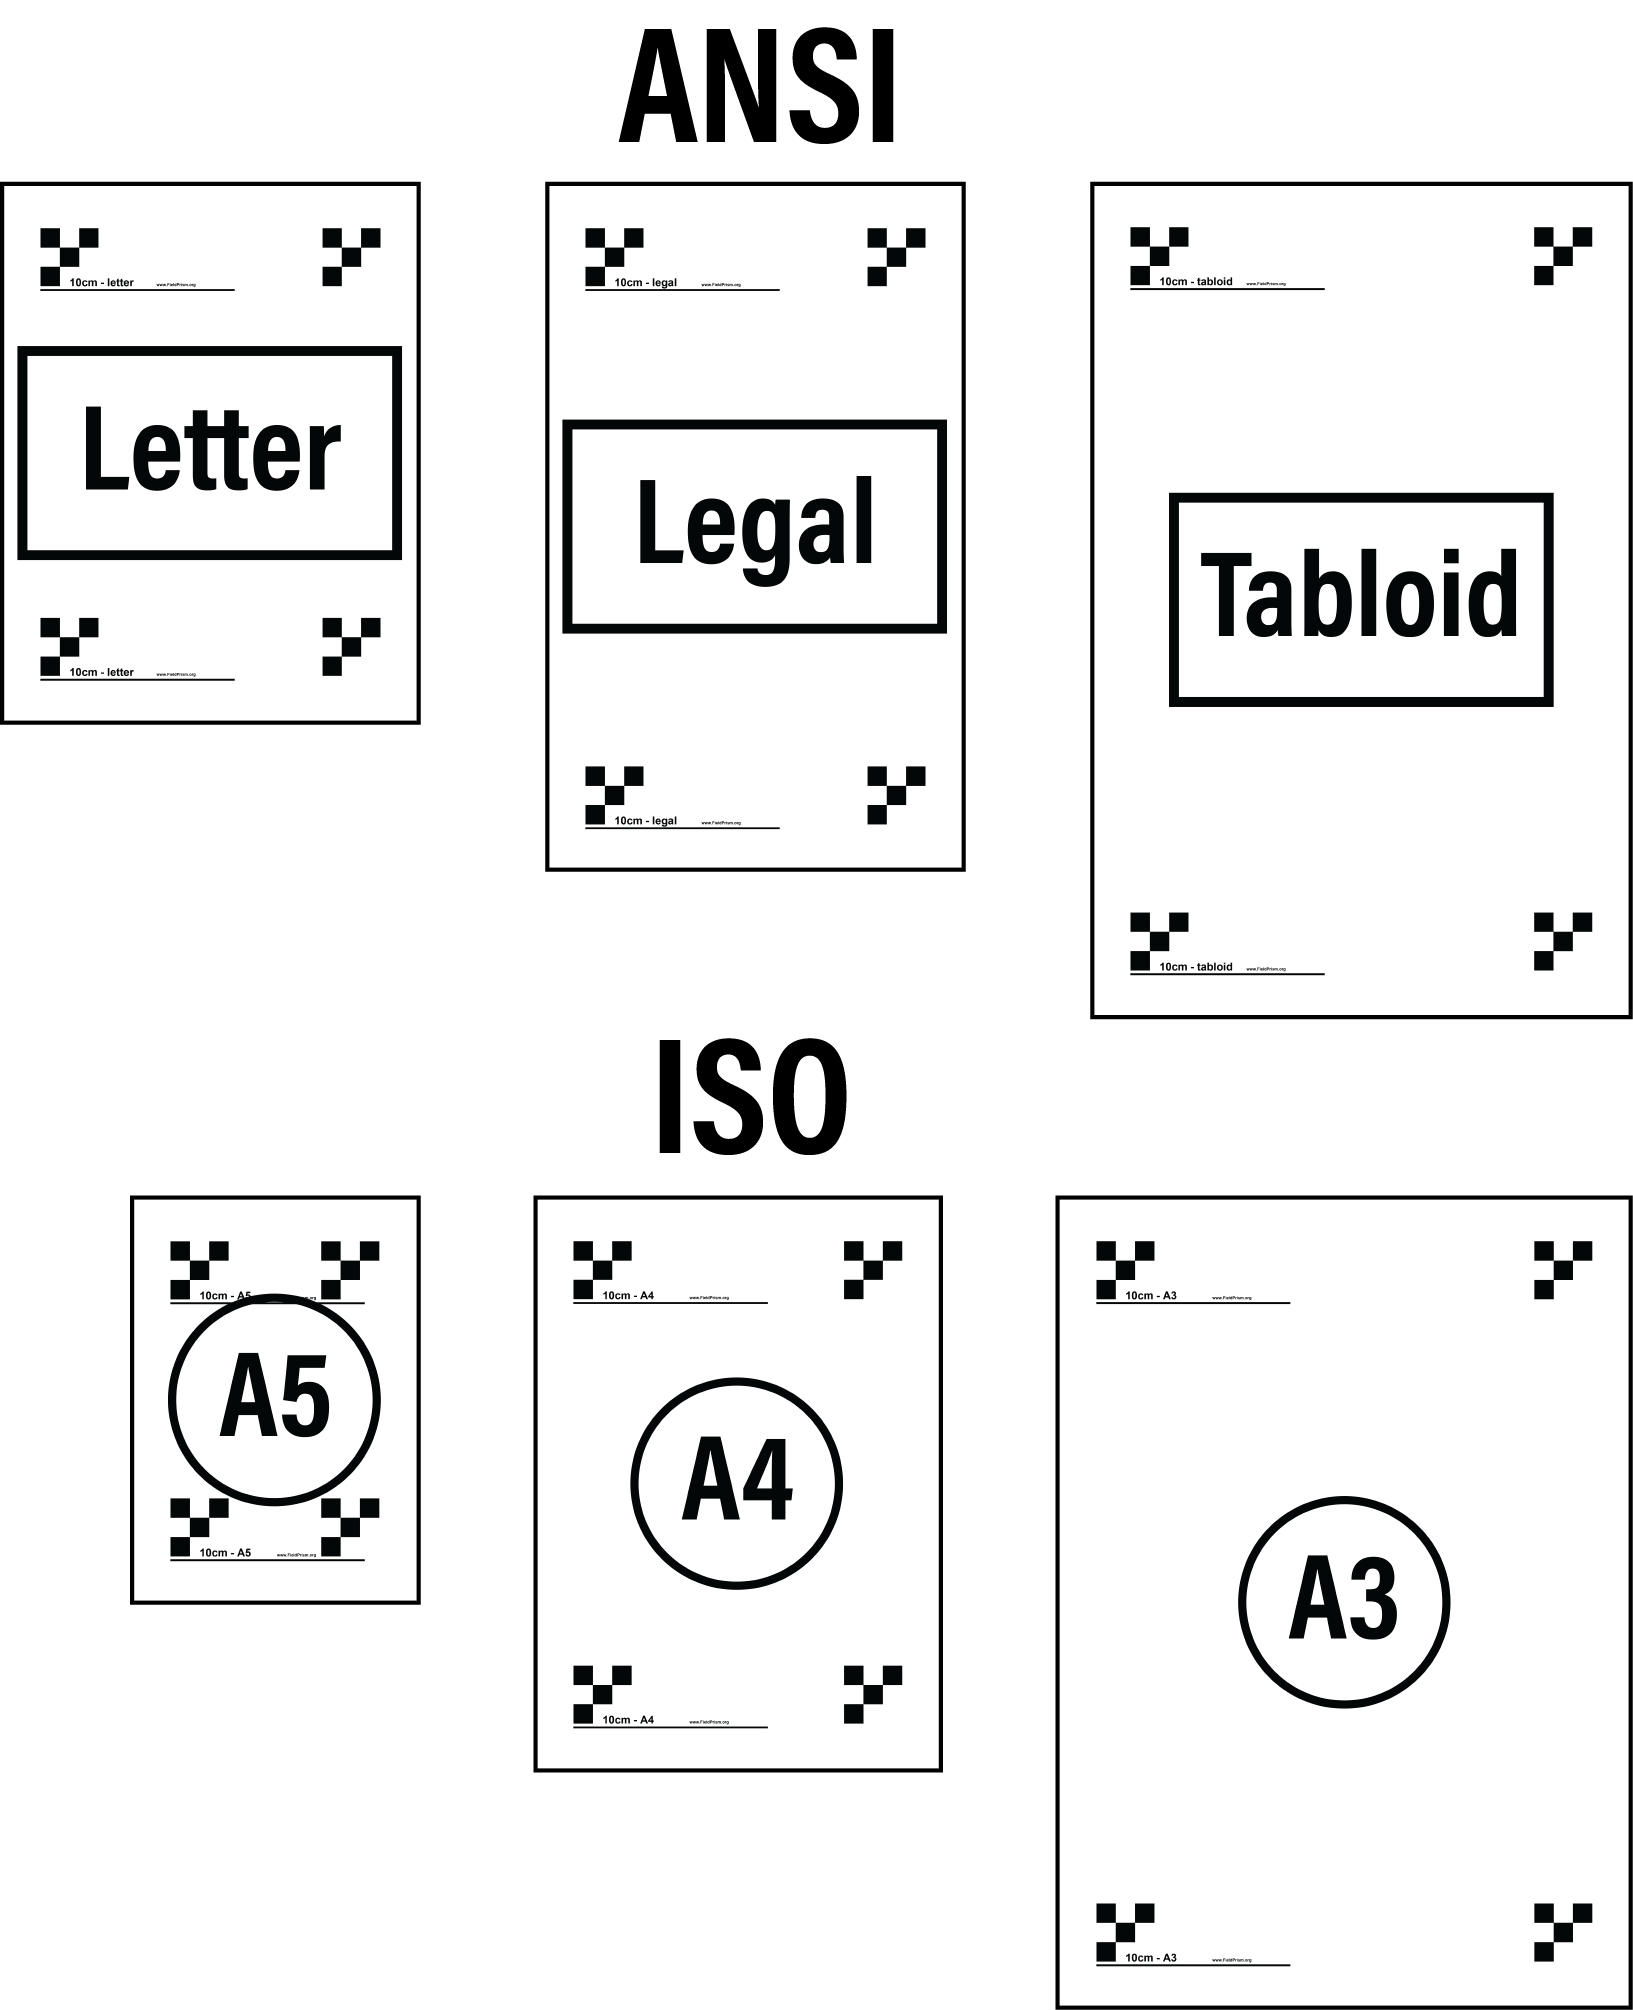
Figure 2: FieldPrism components. (A) Five premade FieldSheet options are available, ranging in size from A5 to A4, legal, A3, and even a custom poster board, to demonstrate non-standard use cases. Tabloid and letter sizes are not pictured. (B) An example of a QR code flipbook with six hierarchical levels printed on waterproof package labels attached to a waterproof memo-sized notebook. (C) Three of the cameras used to validate FieldPrism, from left to right, are a Lumix G9, Samsung Galaxy S9+, and OAK-1. (D) Two FieldStation mobile imaging systems are shown, one designed for A4 or letter-sized FieldSheets (left) and the other for A3 or tabloid-sized FieldSheets and equipped with a smartphone monitor holder (right). The internal components, such as the Raspberry Pi 4, battery banks, GPS module, and USB storage devices, are also visible in the bottom half of both images. Numbers in the images correspond to specific components.
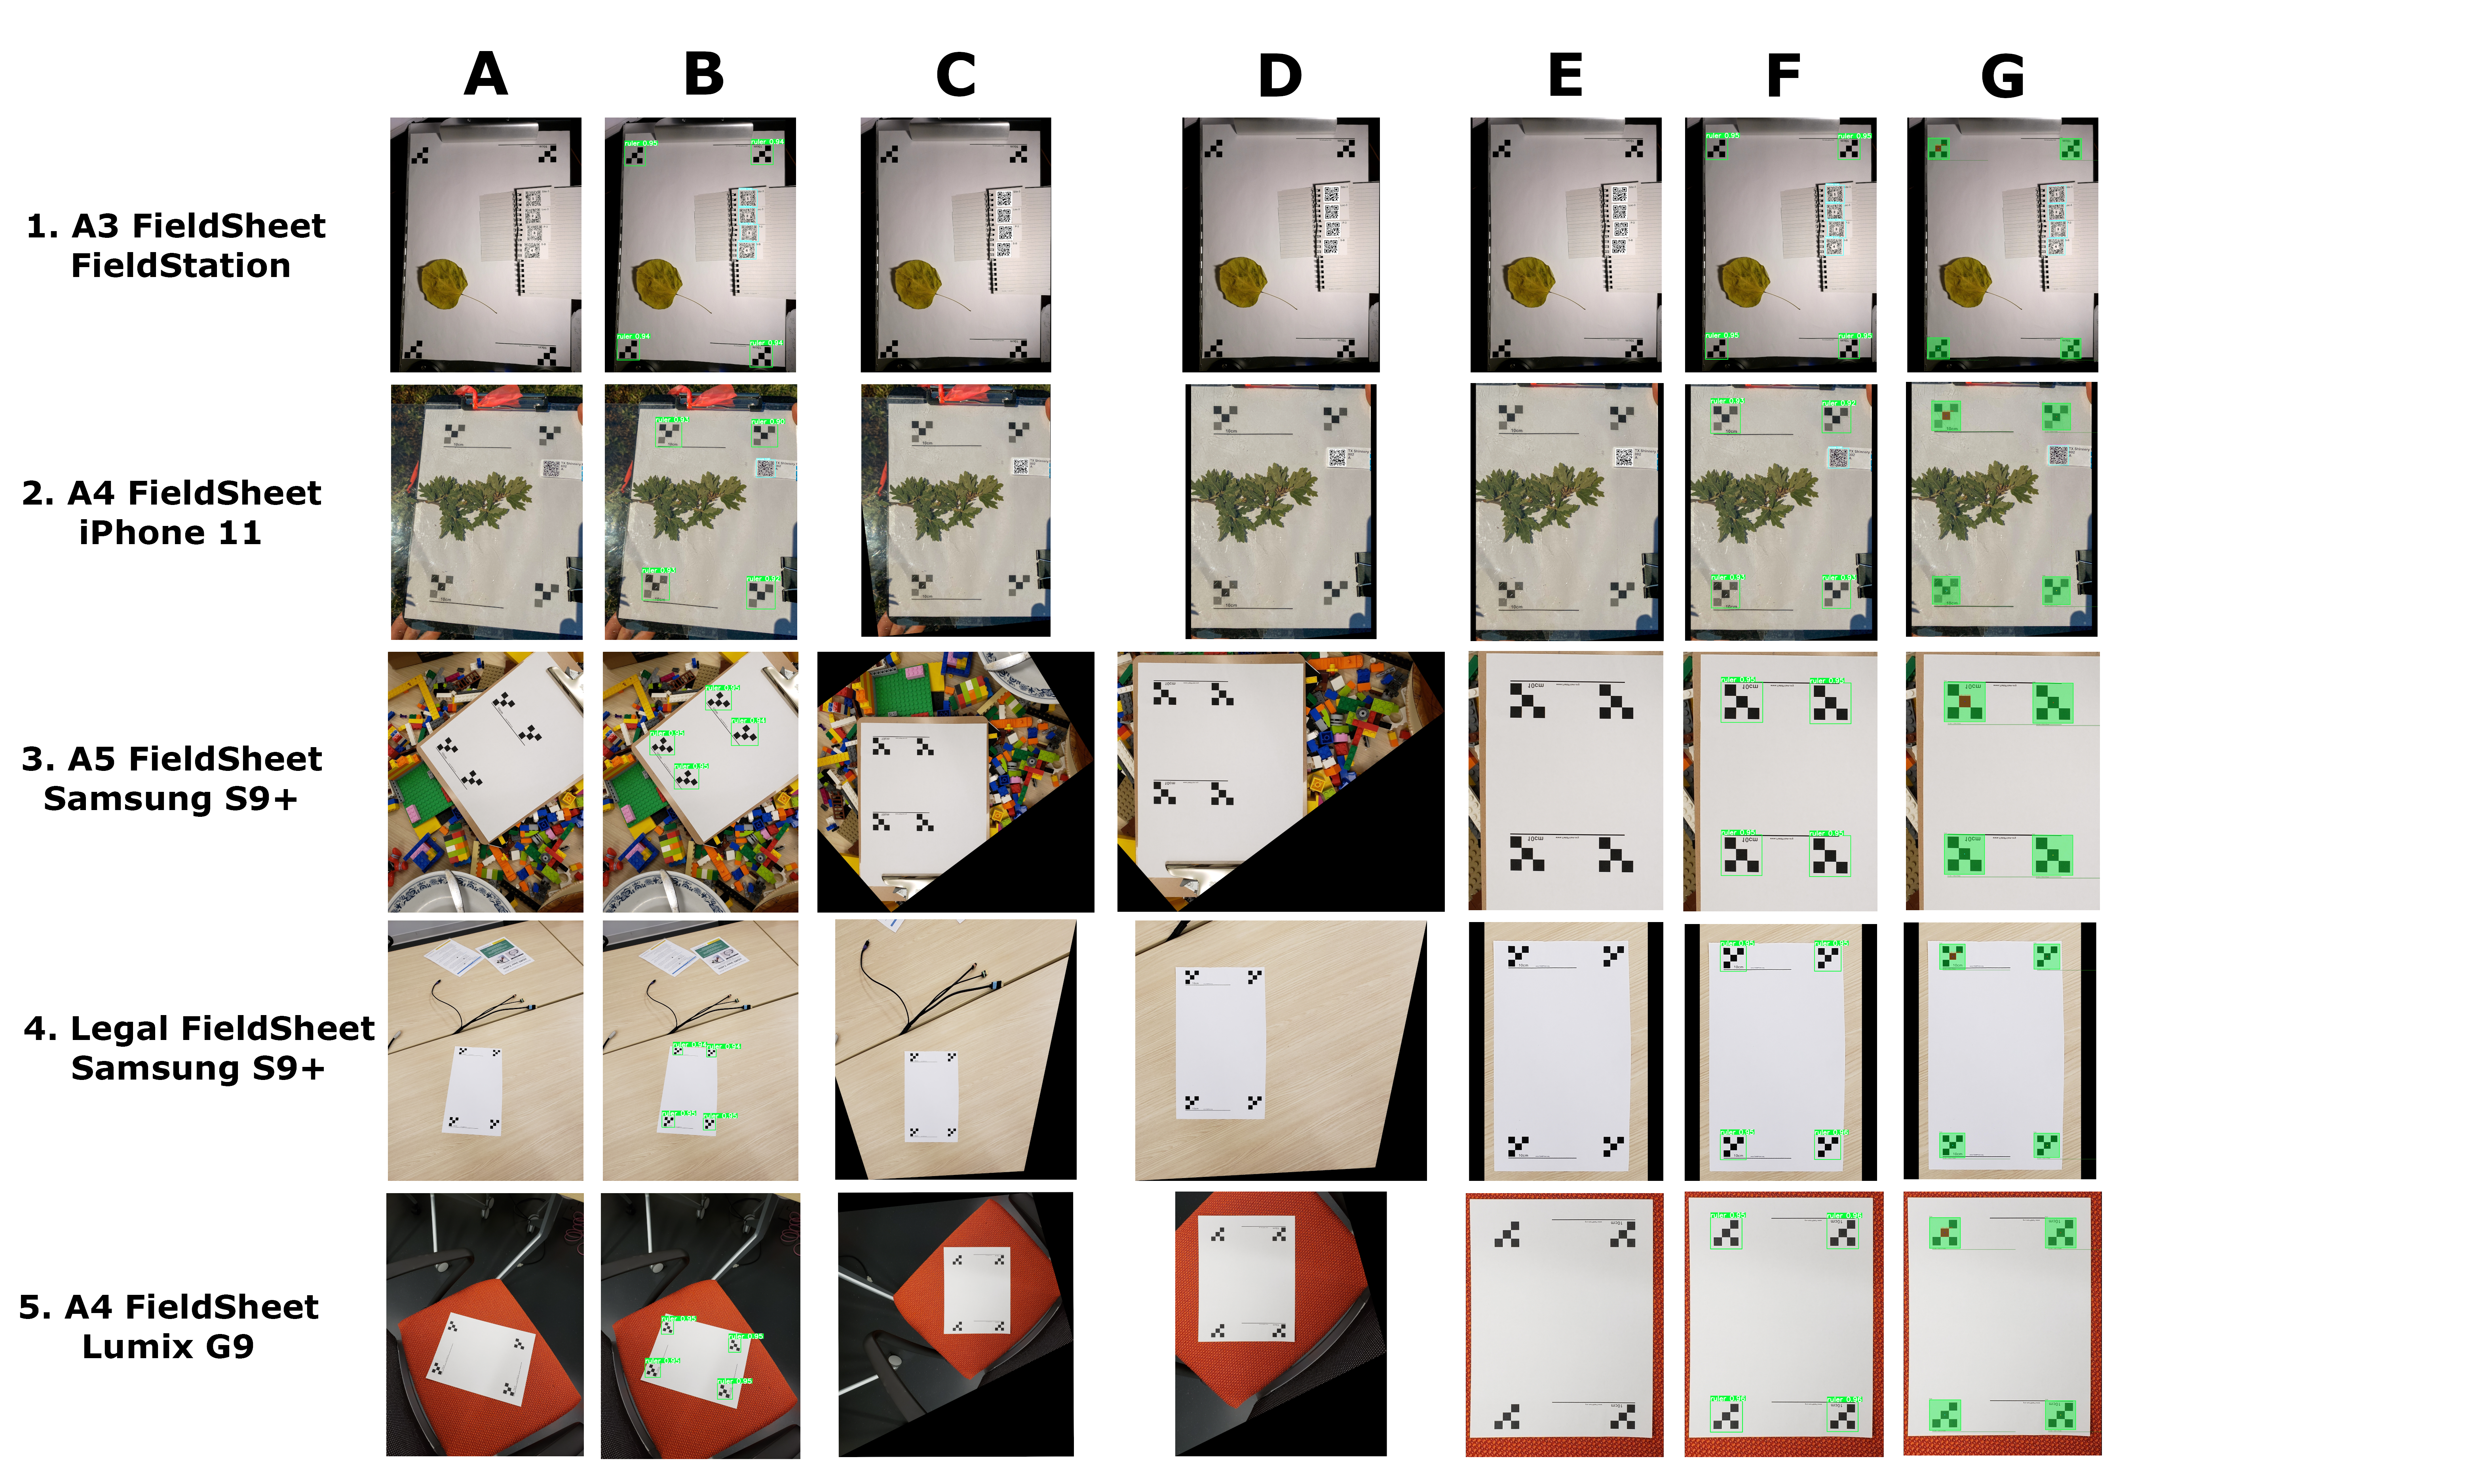
Figure 3: Tracking five images taken with five different cameras and four different FieldSheet sizes as they are processed by FieldPrism. Processed images (columns B-G) are unmodified FieldPrism output images. Row 2 shows an image from our field test using a prototype FieldSheet and QR code, provided by colleagues at the Morton Arboretum. (A) The original unprocessed image. (B) Overlay image showing photogrammetric markers and QR codes identified by our machine learning network. (C) Distortion-corrected image. (D) Top-left justified distortion-corrected image. (E) Uniformly justified distortion-corrected image. (F) Uniformly justified distortion-corrected image with machine learning prediction overlay. (G) Uniformly justified distortion-corrected image with pixel-to-metric conversion verification overlay. Using the conversion ratio, a red 1 cm square and green 10 cm line are overlayed on the FieldSheet for visual confirmation. Users can select between image versions C, D, and E as the final corrected image. Options C and D maintain the original pixel resolution of the image, while option E allows users to configure the final image dimensions (e.g., 3,000 pixels by 4,000 pixels), producing a uniform processed dataset.


Building FieldStation: We share a build guide, component list, and alternative setups for various use cases.

FieldPrism publication.
Download FieldPrism demo kit. We include several images and naming hierarchy CSV files.

FieldPrism source code, installation instructions, and user guide are available on GitHub.
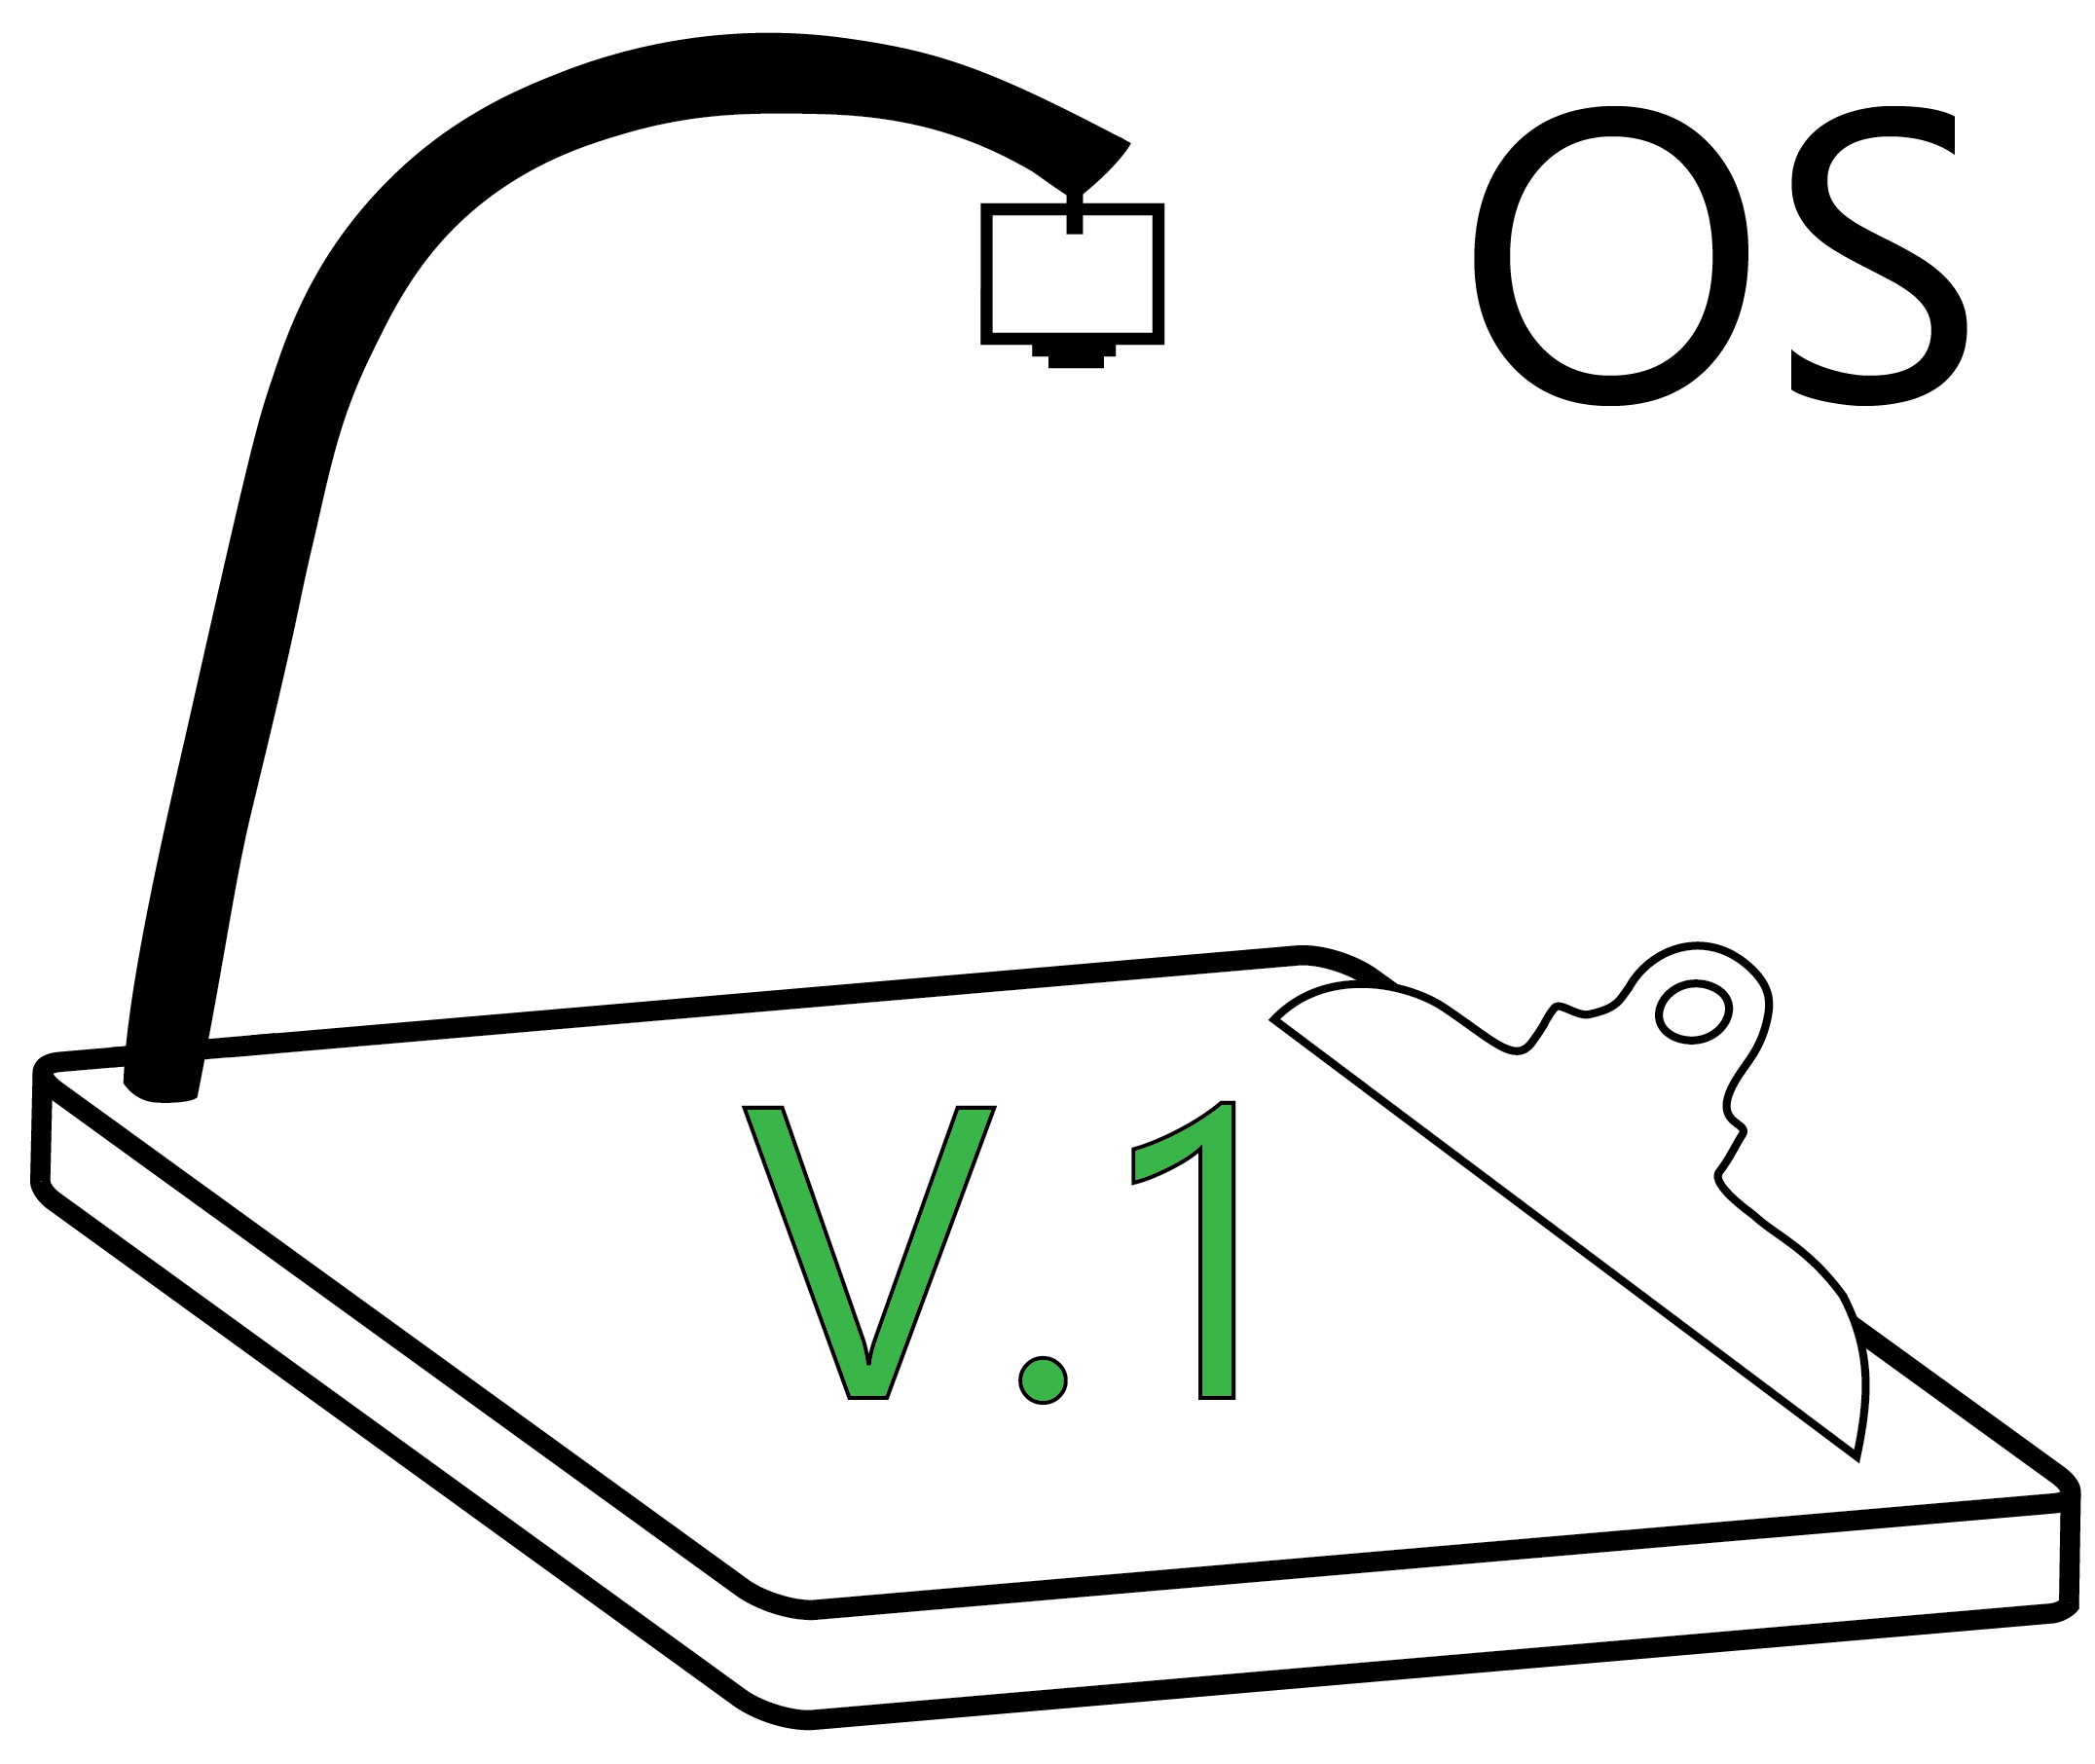
FieldStation OS V.1 includes GPS and imaging support, as described in the publication. Version 1 is built with a 32-bit version of Raspberry Pi OS and does not support machine learning models.
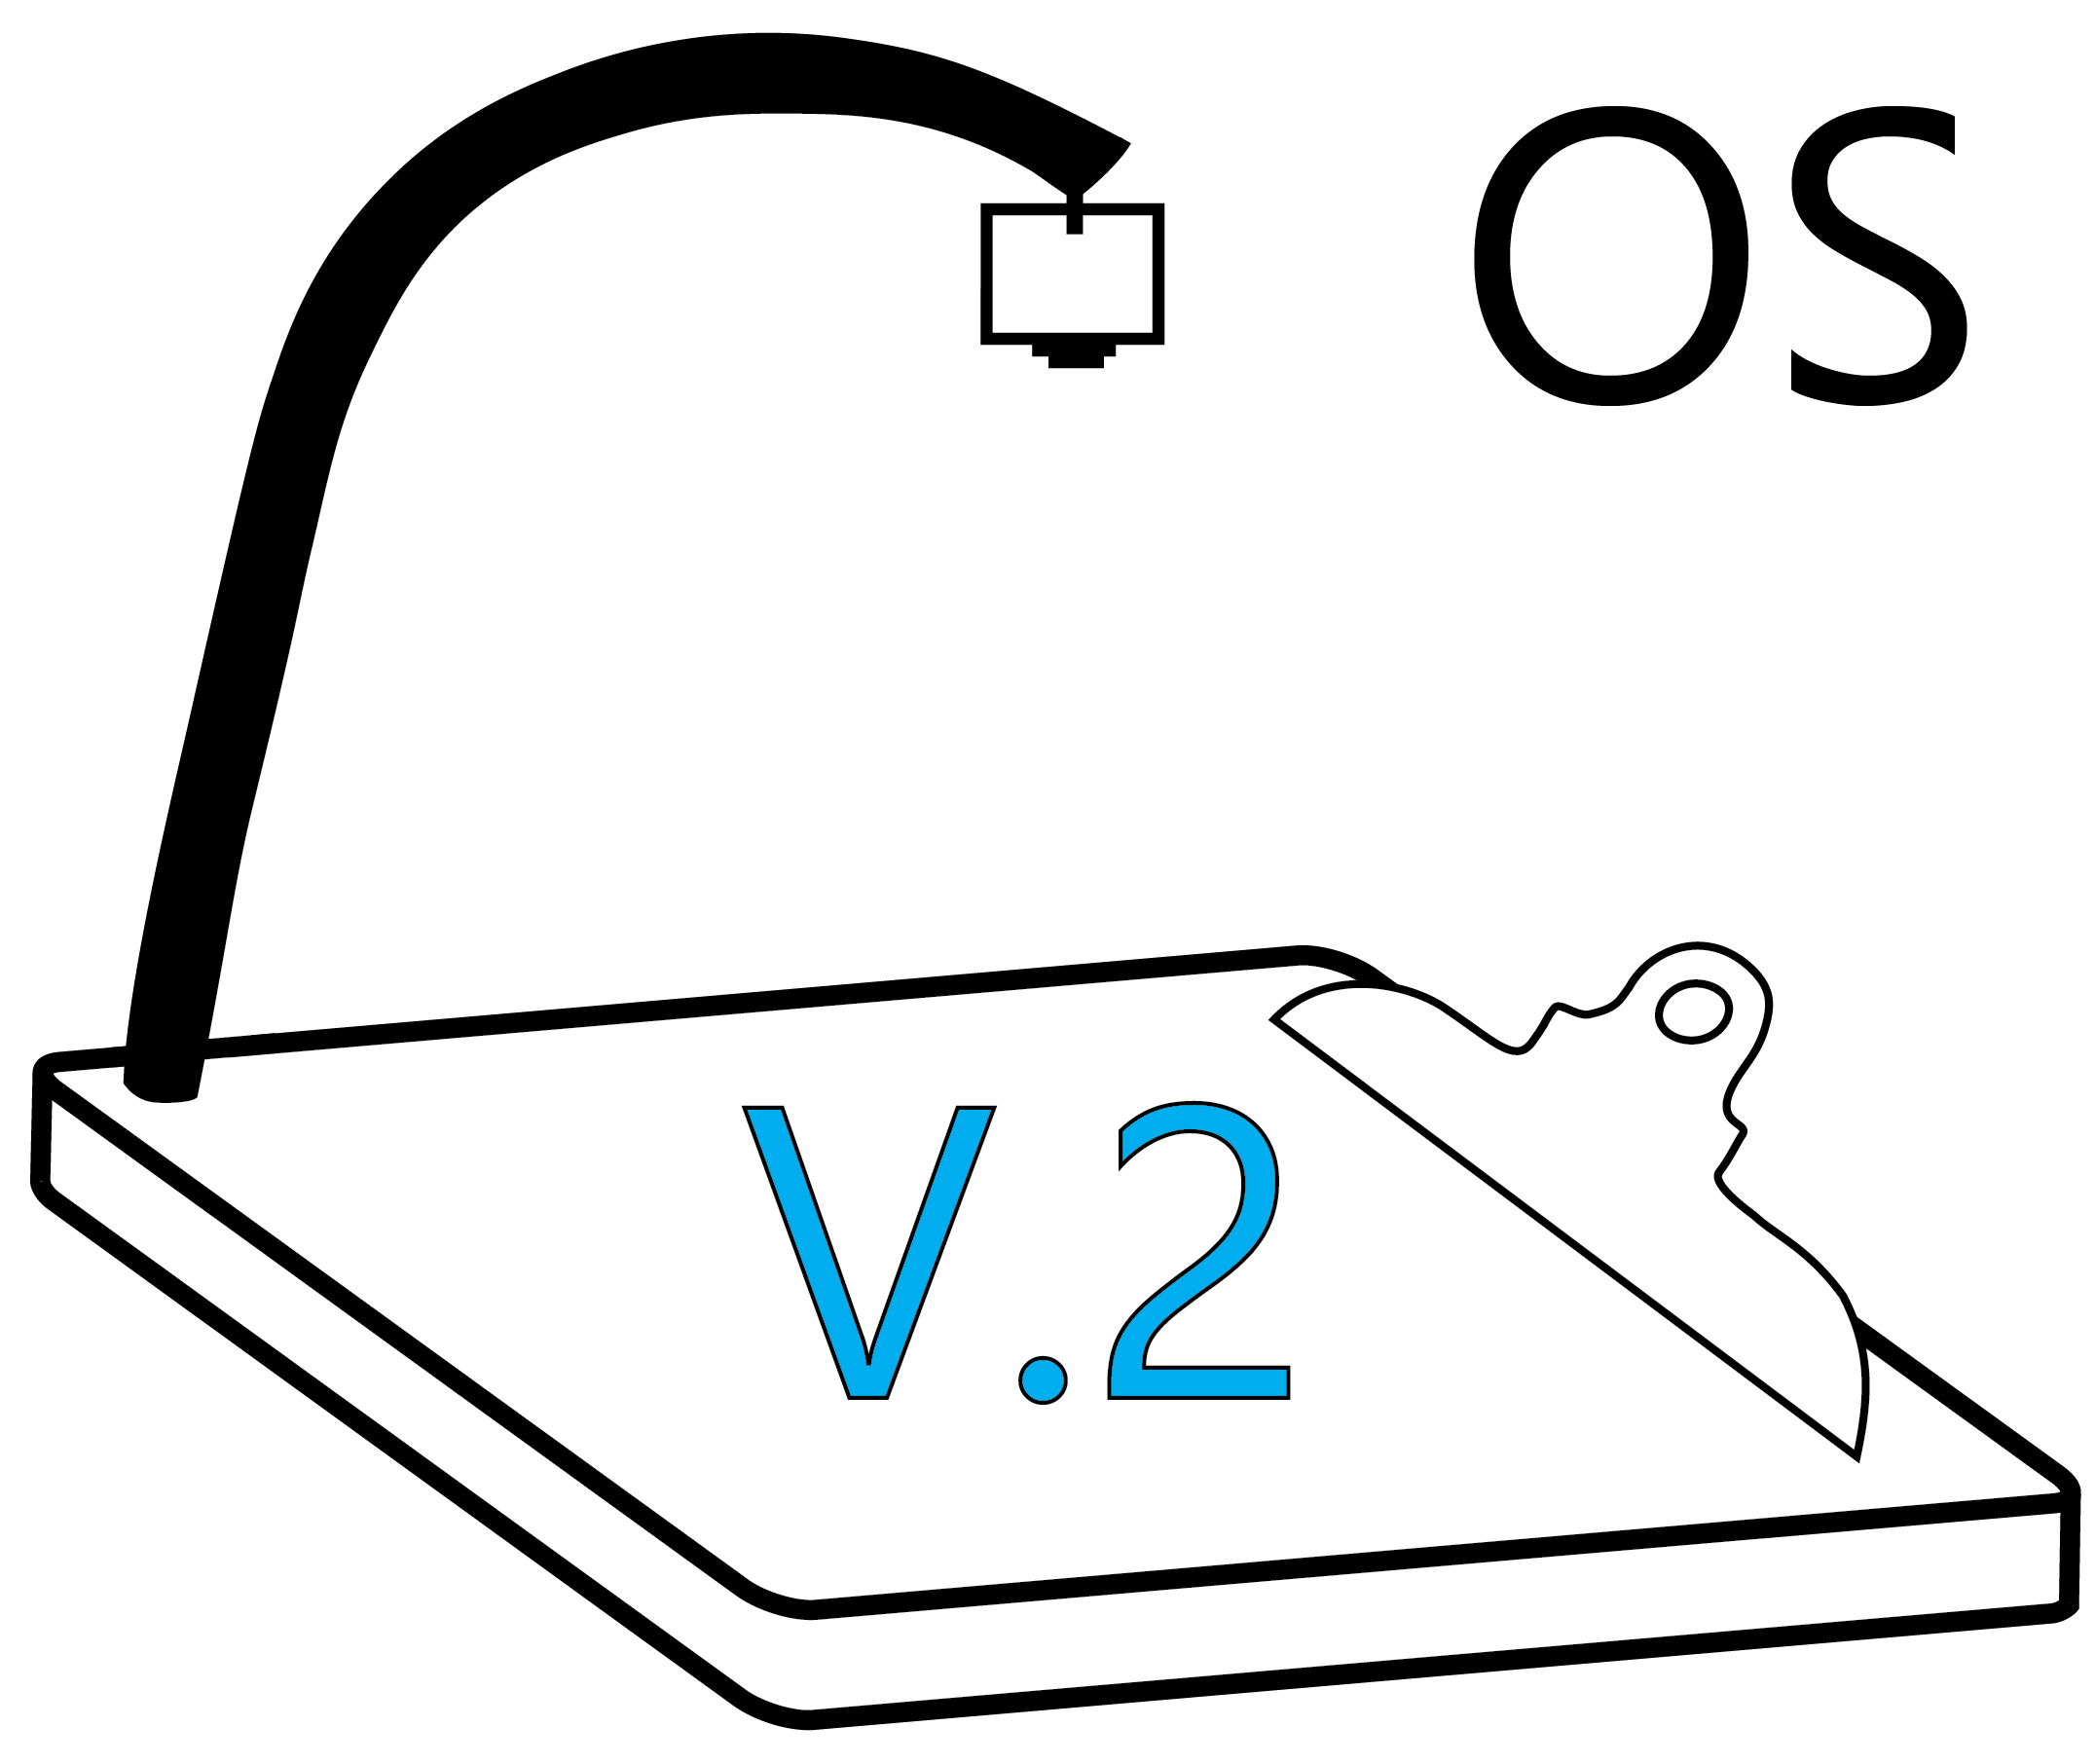
FieldStation OS V.2 introduces machine learning support for the Raspberry Pi, expanding its capabilities. This version is optimized for the 64-bit version of Raspberry Pi OS, enabling seamless integration with PyTorch. After capturing an image, FieldStation utilizes FieldPrism machine learning models to ensure accurate identification and reading of QR codes and photogrammetric markers. Version 2 also includes practical tools to measure GPS accuracy over customizable 5 or 15-minute intervals.
Version 2 utilizes a YOLOv5 nano architecture, which is less powerful than the full FieldPrism model. However, a successful QR code read with FieldStation at the time of imaging ensures that the final FieldPrism processing of the images will also be successful.
These videos were recorded on an Android smartphone. The FieldPrism GUI will look the same on all devices, but the VNC interface may be slightly different. If you connect to the Raspberry Pi with a tablets or smartphone, then get familiar with the VNC controls that bring up a keyboard or give you mouse controls.
1. Mount USB storage devices before each use, click the button twice to be sure. If you remove or replace any storage devices you must mount the devices again.
2. Test the GPS signal.
3. Check the configuration file and change settings if needed.
4. Optionally, check the task manager to view system resources.
5. Run FieldPrism. Wait for camera to autofocus. Make sure GPS has signal; test the GPS to help wake up the GPS module.
6. Take photos and collect data.
7. If FieldPrism freezes or becomes unresponsive, check WiFi and VNC connection first. Then try unplugging R Pi power supply and restarting. Finally, try updating the FieldPrism software.
8. When finished, press the red "Shut Down" button to gracefully power off the device.
Updates. To connect the Raspberry Pi to an ethernet connection, plug one end of an ethernet cable into the Pi's ethernet port and the other end into a router or switch. Next, click the update button in the FieldStation software, which will pull any updates from the GitHub repository and install them on the Pi. This step is important to ensure that your FieldStation is running the latest version of the software and has access to any bug fixes or new features.
Troubleshooting. Make sure that the devices are receiving enough power. Two problems usually cause insufficient power: a weak battery or too many USB devices drawing power from the USB hub. Make sure that the camera is powered with a separate battery. Try removing one USB storage device, or make sure that the USB hub is plugged into the USB 2.0 port.
(0:00) Basic checklist
(0:08) Mount storage devices
You should see the USB drive icons on the screen flicker as they are mounted. The number of devices that you see may not match the number of devices that are connected to the Raspberry Pi; that's okay. Press the mount button twice. Sometimes it takes two tries for all devices to be recognized, especially after adding or removing drives.
(0:18) Test GPS signal
If you are indoors you may not have a signal. If you did not add a battery to the GPS module, it could take 20 minutes to get a signal (also true for first usage with a battery). This video shows no signal.
(0:28) Edit configuration file
Open the config file in a text editor. Change settings if required. Save any changes. These will be overwritten if you update FieldPrism.
(0:52) Run FieldPrism
If you do not see "Ready" moving left and right, then there is a problem. Move the window to view the terminal window; take note of the error. The most common error is unmounted drives or not being able to connect to the camera.
(1:08) FieldPrism is ready to go
Camera is not yet in focus. "Live Camera Focus" shows blurry.
(1:18) Camera is in focus
Camera is in focus. "Live Camera Focus" shows sharp.
(1:22) Show the terminal
Use the VNC tools to drag the main window and show the terminal. The terminal will display any error, usually in red. Green text in the terminal is good.
(1:44) Take a photo
Take a photo by pressing the green photo button or by pressing the key on the mini-keyboard. Note the terminal output.
(2:05) Adjust the camera and take another photo
The preview window adjusts as the camera is moved. The second photo is better aligned.
(0:00) Test the GPS signal
When a GPS signal is available the starup procedure is much faster. Note all the happy green text.
(0:12) Run FieldPrism
When a GPS signal is available the starup procedure is much faster. Note all the happy green text.
(0:28) Arrange windows
Note the happy green text in the terminal too.
(0:42) Test the GPS
(0:48) Take a photo
(1:14) Quit FieldPrism
(1:18) Shut down
(1:22) Disconnected